Published on Getting Smart, November 15, 2017
In honor of International Education Week, we’re bringing you a series of blogs that celebrate the benefits of global competencies, international education and cultural exchanges. Stay tuned for more like this throughout the week!
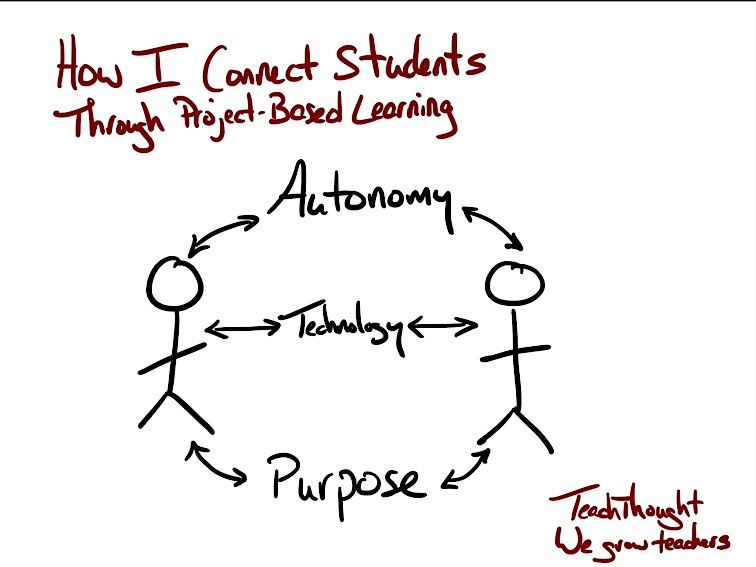
Project-Based Learning (PBL) offers tremendous benefits for students to become engaged in more authentic and purposeful learning. Providing opportunities in which students have choices in what to explore, where to seek information, and ultimately how to share their learning, will lead to higher student engagement and more meaningful learning experiences. By giving students the chance to be curious in exploring a concept which is of personal interest, or working together to tackle a problem or engage in some challenge-based learning, we foster more student-driven classrooms and promote curiosity in learning.
As educators, we need to strive to open up opportunities for students to broaden their perspectives, to engage in collaboration with their peers, and more importantly, to become globally connected learners. PBL is a way to connect our students globally and it also addresses the 4 C’s: critical thinking, collaboration, communication, and creativity. Opportunities like this, in which students can become more independent and have choices for where their search leads them will amplify the learning potential of all students in the classroom as well as for the new connections made.
Entering my second year of project-based learning I wanted to take it to another level with my Spanish classes, after attending and presenting at EdmodoCon. I was amazed at the power of technology to unite educators from around the world and I wanted to do more in my classroom. Learning from such diverse perspectives, and fascinated by the ability to communicate with my new colleagues, at any time from around the world further solidified my belief that this was something that must be done in my classroom. I wanted my students to have as many diverse, authentic opportunities to explore the world as they could.
Setting up a process to connect students with the world can take some time to plan as you must decide what is the best method and structure to use, but getting the connections started is really quite simple. There are many different learning communities available depending on what is used for a classroom website. I use Edmodo, but there are also professional learning communities available through ISTE or Google+. Getting started simply takes posting a message in the community and awaiting responses from other educators interested in making new connections.
Here is the process I followed to get started with my class:
 1. Shared the idea: I told students the idea for making global connections and the “why” behind this newexperience. While doing PBL, it is essential to have the students connect with real-world experiences in authentic ways. Once I explained to my students how I had planned to do this, I then posted a message in a few of the Edmodo communities. In my message, I explained what my students would be doing, the types of topics they would be learning about and how we could collaborate.
2. Collected responses: I received several responses to my message and replied to each to gather more details about the age group of the students, the location of the classroom and options for connecting our classes.
3. Created groups on Edmodo: Once several educators were interested, I created a separate group on Edmodo and shared the join code with my students as well as the students from the other classrooms. Edmodo provides a safe place to interact to not only help students become globally connected and share their perspective, but is also an opportunity to learn and connect with other educators.
4. Got started: We started by simply making introductions and then the students started to ask questions related to their project-based learning and essential questions. The students were amazed and excited about how quickly responses were received and how willing the other students were to share information, provide resources and interact with one another. It has been tremendous to see how much the students have learned in such a short amount of time. This type of learning could not occur without technology, it provides authentic and personalized learning because the students are connecting globally and broadening their perspectives in a more engaging and personalized way.
5. Expanded the project: In order to take it even further, once the conversations and connections had been established, we wanted to interact through audio and video. Due to the difference in time zones and schedules, we needed to find a more convenient way to interact. Flipgrid presented the perfect solution for setting up an online space for students to introduce themselves, show their schools, and have some fun interacting in a moderated and safe environment. It was very exciting to receive the notifications that a new Flipgrid response had been posted, and watching it immediately in class was fantastic for the students. Students can learn by looking at pictures, reading books and watching videos but to be able to interact in this way and this quickly is truly an amazing experience. The best part was when the students were finally able to see the students they had been interacting with. We also used Padlet as another virtual space to interact through photos and conversations.

Being an educator does not mean that you are an expert. We are constantly learning and should be seeking new ways to bring knowledge and different learning experiences into our classrooms. In just a few short weeks of working with these global connections and setting aside the time to open up and increase the learning potential for my students, I have learned so much. For the four teachers in our group, this is the first time that any of us are doing anything like this and we are learning and growing together. We are enjoying the experience with our students and the best part for me, is learning more about my own students through their interactions online and I believe that the students are learning more about themselves as well.


 y, student driven. Here is how Kidblog can help.
 Getting ready for the start of a new school year – new students, new curriculum, and new tools – means teachers have a lot of preparation ahead of them. Whether new to Kidblog or a veteran classroom blogger, these tips will help you get the most out of your class blog this year.