Time for new ideas


null

The end of the school year is the perfect time to try the tools or explore new ideas that perhaps you did not get to throughout the year. We can also use this as a time to prep for the next school year. By trying different tools and platforms during the last few weeks, we can then take the summer break to reflect on their impact on student learning. During the spring, I notice a drop in student engagement and an increase in the number of students missing classes due to testing, sporting events, or regular absences. Finding a way to keep students connected and engaged in the lesson is critical.

To resolve these challenges, I try to find something that will benefit students, resolve any disconnect or gaps in learning that might be happening and increase engagement. A new tool that caught my attention recently is NoteAffect. It is a platform focused on enhancing and understanding student engagement and empowering teachers with a powerful tool to better understand student learning.

Why NoteAffect?

NoteAffect provides a unique platform for personalizing the learning experience for students. Using NoteAffect, teachers can deliver lessons in a more interactive way that empowers students to be more involved in the lesson and have access to all of the course materials within one platform. Whether or not students are present in class, they can log in to their account at any time and either view the lesson they missed, or review a lesson in preparation for an exam or for continued review.

NoteAffect offers the right resources and methods to better engage students in learning and helps teachers to track student progress, better understand the questions that students might have and use it as a way to reflect on their own teaching practice. Worried about having devices that are compatible with? No worries as NoteAffect can be used on a PC, Mac, Chromebooks, Android, and iOS devices, so students can interact in class or on their own schedule.
null

Getting started with NoteAffect is easy!

Finding time is always a challenge with so much to do in our school days and prepping throughout the week. However, with NoteAffect, teachers can quickly set up an account, invite students to join classes and begin sharing a lecture. The dashboard is easy to navigate and it provides access to the materials that empower teachers to better understand student needs and learning trends.

Once you have created your courses in NoteAffect, it is easy to have students join in the course and participate in minutes.

To invite students, simply follow these steps:

  1. Go to your Dashboard and select “Instructor Tools” and then “Course Management.”
  2. Select the appropriate course from the menu on the left.
  3. Select “Participants” and then select “Add participant” from the top right corner.
  4. Enter the student’s email address and click “Add.”
  5. Students will receive an email with a  prompt to join the course.

Once students are participants in your course, they will be able to see any prior lectures and participate in the current lecture being delivered.

To start a lecture:

  1. Click “Start new lecture” and you will be prompted to open the Broadcaster.
  2. Once the Broadcaster window opens, use the drop-down menu to determine which application to display or if you have other files that you want to use for your lecture.
  3. Once you select the app, it starts to share your screen with your students and it will record the audio as well.
  4. When finished, simply End Lecture and it will be available to students.

Features of NoteAffect

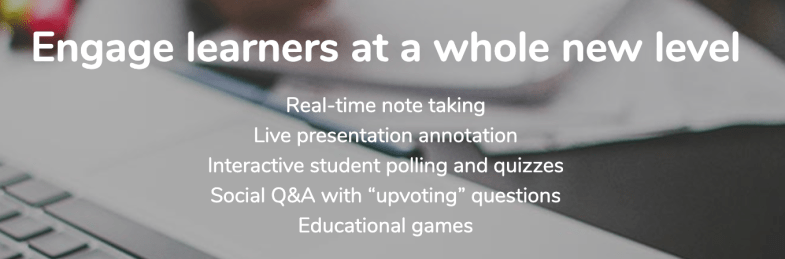
  • Students can take notes, highlight important points, make annotations on the lecture notes and even submit an anonymous question during class. Classmates can see the questions and upvote a classmate’s question, making it more interactive.
  • It’s a great way to have everything accessible in one place as opposed to writing on pieces of paper or having to pull from different presentations. By using notes, students have access to everything within one platform, making it even easier for students to manage.
  • Teachers can deliver their lessons and add in or embed live polling, and further engage students in the lesson.
  • Using the analytics, teachers can see the level of participation and engagement with the material.
  • Analytics provide information including the views, notes taken, words per note and annotations made by students, providing a clearer picture of the level of understanding and engagement of students.

null

It will be easy to get started with NoteAffect in your classroom or to recommend to colleagues and administrators for use in their classrooms and schools. To learn more, check into NoteAffect here and get started with a demo today! Be sure to follow them on Twitter 


For my prior post on NoteAffect, click here


Screenleap for Education: Learn From Anywhere at Anytime

This post is sponsored by Screenleap. Opinions expressed are my own.

At the end of January, I attended the Future of Educational Technology Conference (FETC) in Orlando. FETC has become one of my favorite conferences to attend and each year I return to my school with a lot of new ideas and tools that I’m excited to try in my classroom and share with colleagues and educator friends. This year was no exception. After reading about the 31 start-up companies that would be participating in the “Pitch Fest” competition happening in the expo hall, I decided that I wanted to start there. These companies—the “best-of-the-best startups”—would be pitching their products and services to a panel of judges. I find this to be one of the “musts” for me each year to learn about the new ideas and products available to educators. I enjoy getting to talk with the companies to understand their tools and how it benefits educators and students.

null

Before arriving, I had received a flyer from Screenleap. I took a quick look, but decided to set it aside and instead make time to meet with Tuyen Truong, the CEO and Founder of Screenleap, at the conference. We had a great conversation and I was immediately impressed with what I learned about Screenleap from Tuyen and from the reactions of other attendees who had stopped by the booth to learn more about Screenleap.

Not long after speaking with Tuyen, I presented my own poster session on designing “Creative, Personalized, and Productive Classrooms.” A common interest of the attendees was that they wanted to know options that would enable them to share lessons, to work with schedule changes that interrupted the normal class periods, and to provide access to learning opportunities for their students when their students needed them. Screenleap immediately popped into my mind and so I gave them a brief overview and pointed them in the direction of Screenleap’s booth in the EdTech Startup area.  

null

Tools with Purpose: Getting Started Quickly

Common issues for teachers regarding education tools are knowing where to start and whether something will have a big learning curve. These are both important factors, but we should also consider the WHY behind adding the technology. Based on the interests of the educators that I spoke with, thinking through it and trying it out on my own, Screenleap definitely addresses these concerns by making it easy for teachers to set up and start using with students and by saving valuable time for teachers who use it.

So How Does It Work?

null

Screenleap for Education allows teachers to share their screen with students and record it for later viewing. Whether the students are in the classroom or absent from class on a given day, they can watch the screen share live from wherever they are or access the lesson afterward when it is convenient for them. You can learn more about Screenleap for Education here. If you would like to try it out, you can start a free trial here!

Why Use Screenleap for Education?

When thinking about adding some new technology into the classroom, we really need to focus on the why behind choosing a specific tool or method. What difference will adding this tool make and how can it enhance the learning process and go beyond the traditional methods that are being used? What sets it apart from other tools you are currently using?

I think the benefits are clear with Screenleap for Education:

  1. Teachers can share from any device (including Chromebooks, iPads, Android, PCs, and Macs).
  2. Students don’t need to install any software to view their teacher’s screen, which makes it easily accessible to all students and saves time on IT administration.
  3. Everything is automatically recorded on the cloud for later playback. Teachers don’t need to manually upload the recording after the screen share.
  4. It saves teachers a lot of time because now they do not need to reteach lessons to students who miss a class since the recorded lessons are available for students to watch on their schedule. In addition, when it comes to re-teaching, you don’t always present the information the same way, so having a solid lesson that can quickly be shared with students to view and learn from is a real benefit for you.

Ideas for Using the Recording Feature

Depending on the content area you teach, or even if you have a different role than a classroom teacher, creating these recordings is easy and of great benefit. Having recordings available that you can share with colleagues, offer as extra instruction for students needing review, or even as a way to get feedback from colleagues about how you delivered a lesson, are just a few of the great ways to use the recording feature of Screenleap for Education. There are a lot of other possibilities for teachers, students, and administrators when the recording feature is used as part of a teacher’s daily instruction.

Getting Started

I found Screenleap for Education very intuitive and easy to get started with:

  1. After creating your account, there is an initial setup step where you can create your classes and add students to them.
  2. Once your classes are set up, it is easy to start sharing your screen with your students: all you need to do is click on the button for the class you want to share when your class starts. If it’s your first time sharing your screen, you will be walked through a one-time app installation before your screen share begins. null
  3. Once your screen share has started, your students can watch your screen share by signing into their accounts and clicking on the “View live class” button for your class.
  4. While you are sharing your screen, it is automatically recorded in the cloud.
  5. When you stop your screen share and have recording enabled, your recording will be processed and made available to you from the “Recordings” page. If you have automatic sharing configured, the recording will also be made available for your students to review.

null

Additional Features That I Like

  • If you want to remove something from your class recording, you can do so and then upload the updated version.
  • You can share the same recording with multiple classes.
  • You can track student engagement in real-time by clicking on “engagement” or after the recording has been processed. You will see a snapshot of the engagement graph at the bottom of every recording.

Conclusion

Screenleap for Education offers a lot of benefits for teachers, students, and administrators: students can easily follow along in the classroom or from home, teachers do not have to reteach lessons that students miss, students can review lessons before tests, and administrators have resources available  that can help to improve test scores for their schools through better learning. In addition, being able to stay connected and keep up with class—even when not in the classroom—and having information available to share with other teachers and administrators really makes Screenleap stand out when it comes to tools that benefit student learning.

Let me know what you think of Screenleap for Education. Again, you can start a free trial here

Shapes 3D: AR Drawing App

Shapes 3D: AR Drawing App

An area of focus at FETC, TCEA, and PETE&C: Bringing Augmented Reality to Every Classroom

Rachelle Dene Poth

February 22, 2019

This is post is sponsored by Shapes 3D. All opinions expressed are my own.

Over the past few weeks, I have been fortunate to attend and present at several educational technology conferences. First was FETC (Future of Education Technology Conference) in Orlando, then TCEA (Texas Computer Education Association) in San Antonio, and the most recent, PETE&C (Pennsylvania Educational Technology Expo and Conference) held in Hershey, PA. A large part of my experience at each of these conferences involved presenting on and attending sessions about Augmented and Virtual Reality. There has been more discussion and a lot of excitement recently surrounding the AR/VR tools and exploring how these tools can be used for education. In my own classroom experiences with students, I have seen tremendous benefits for students by implementing some tools for augmented and virtual reality as part of their learning experience. The tools we have used give students an opportunity to engage in a completely different kind of learning which gives them more control in the classroom, and an immersive and authentic experience.

Learning Potential with Shapes 3D Augmented Reality

The terms “augmented and virtual reality,” might seem to be complex concepts that require a big investment of time or come with a steep learning curve. However, with tools like Shapes 3D, this is not the case at all. Shapes 3D provides the perfect opportunity for students and teachers to explore core concepts of geometry and help students to discover 2D and 3D shapes by engaging with these shapes in an augmented reality experience. Using a Merge cube, students can now examine 3D shapes in Augmented Reality. Imagine learning geometry by holding the solids in your hands, manipulating them and being able to more closely understand the core concepts of geometry. In personal experience, having this app available during my ninth grade year would have made a huge difference in how I was learning and the way that I could build on my knowledge! Preview it here!

Getting Started

Whether you have experimented with AR/VR or not, getting started with Shapes 3D is quite easy to do. If you prefer to have a tutorial, Shapes 3D has videos to help you get started. Often the number one answer given when educators are asked why they are not using technology or even a specific tool in the classroom is due to a lack of time. There are so many components to teaching today that can make it a challenge to find extra time to try new tools or implement new methods. Fortunately, Shapes 3D makes it easy to get started with the availability of bundles to use for instruction, access to lesson plans and tutorial videos that can help any educator get started quickly. You can gather a lot of ideas by searching through Twitter looking at tweets related to Shapes 3D, especially when it comes to edtech conferences, which can provide new ideas and new connections. There are also publications and other helpful resources shared and updated on the Shapes 3D site. You will love Shapes 3D applications, get started by grabbing a bundle at the price of $ 5.99, Shapes 3D Bundle!

If you are like me and prefer to just get started without tutorials, start by exploring the tool and the options available, and then dive right in! Use Shapes 3D as a way to introduce a concept or shapes to students, to act as a “hook” for the lesson. Once students begin engaging with Shapes 3D, give them the opportunity to create and explore on their own and run with it. They will likely exceed your own knowledge of the possibilities that exist with Shapes 3D and that is okay. You will notice that students catch on rather quickly and will become immersed in more authentic and meaningful learning, right in their hands. It is a lot of fun to use the Merge cube and really look closely at the shapes!

Merge and Shapes 3D

Students can easily explore the object by using their device or a classroom iPad for example, if accessibility is an issue consider using stations in your classroom, where students can work in small groups. But if you want to take it to another level and really put the learning in the students’ hands, why not get a few Merge cubes to use with shapes 3D. What is so unique about this possibility is that students will be able to interact with the object and even draw lines and manipulate the shapes in their own ways, which will provide a more personalized learning experience for them.

Learning from others

Shapes 3D is great for teachers to use as a way to engage students, but also to provide opportunities for students to become the teachers in the classroom. Like presenting at conferences, getting to share what you are doing in the classroom, to brainstorm ideas with classmates, and maybe more importantly, have the opportunity to learn from one another builds more confidence in learning. The great thing about tools like Shapes 3D is that educators will not have to spend a lot of time trying to figure it out on their own or come up with ways to use it in the classroom. Leave it to our students. We need to push for more opportunities for our students to do more than consume, but instead, to create, to explore and to become curious for learning. Using technology in classes today should be focused more on creation rather than consumption.

So why use Shapes 3D?

As educators, our purpose is to help our students to develop a wide range of skills that will not only engage them in learning which is authentic and meaningful but also provide skills that will We want to put tools that can engage them and more authentic and meaningful learning in their hands. Students learn more by doing and having opportunities to engage in hands-on activities, where they control the direction their learning takes. We need for students to design their own problems, to ask more questions, and even at times to experience some struggles in learning. Preparing them for the future means giving time for them to problem solve, collaborate, communicate and even create on their own as they are preparing for the future and life in general.

Before adding technology into the classroom, be sure to focus on the “why” behind using a specific tool or method. What is it going to do differently for students, that will enhance learning and go beyond the traditional methods t being used in the classroom? What sets it apart from other options? I think the answer is clear. Tools like Shapes 3D will enable teachers to move students to a more active role in the classroom, become the creators and immerse themselves in a new learning environment. Students can do so much with Shapes 3D to really understand geometry concepts that might otherwise be difficult to understand, in a 1D format. Draw lines, rotate solids, check the properties of the solids and more. Hands-on learning takes math to a new level.

Options and getting started

By having a Shapes 3D bundle, students in grades K through 12 have access to a wide variety of ways to interact with different structures and to really understand math concepts at a deeper level. When we can place tools like this in the hands of our students, we amplify their potential for learning, because of the accessibility to explore on their own and build their skills as they manipulate the objects in the 3D space. It pushes student curiosity even more and leads them to ask questions and to develop their understanding at a deeper and more meaningful level.

As teachers, there are so many things that we are responsible for and need to keep up with, that it can be difficult to stay current and relevant with all of the emerging trends when it comes to technology. Fortunately, there are tools like Shapes 3D that make it easier to get started and that provide innovative ways for students to learn. It just takes a few minutes to get started and then encouraging the students to explore on their own and with peers. Join in the Geometry learning fun with Shapes 3D Geometry Drawing on iOs today! Enjoy the app (for free) on Google Play, there is a beta version of Shapes 3D Geometry Drawing, and it works with Merge cube!

Don’t wait, sign up today! Get started with Shapes 3D applications by grabbing a bundle at the promotional price of $ 5.99, bit.ly/Shapes3Dbundle !


No-tech, Low-Tech or All Tech: 5 new ideas to try


**Slightly updated from an earlier post, but some ideas to get that energy back up

Ending  the year with 5 random ideas: Going back to basics 

The end of the school year is a great time to try some new ideas. With summer approaching,  we have time to reflect on methods used this year and to seek out new ideas and tools, to come up with creative and innovative methods and ways to welcome to students back in the fall. Hopefully these new activities will help to keep students more engaged in learning.

Here are 5 ways to have students connect, collaborate and create. These are also helpful for building peer relationships and for reviewing content or assessing skills at the end of the year. These ideas can be no-tech or using something suggested by the students.

1) Random games or icebreaker style: There are tons of ways to create icebreakers, whether by using paper and pencil or even with digital tools. For example, with Buncee, Piktochart or Canva students can come up with four statements about themselves to share with classmates. These can be in the form of three truths and a lie, as a way to help students learn about their peers and for the teacher to learn about the students. It is beneficial for making connections with one another, finding things in common, but also to appreciate the different perspectives and backgrounds students bring into the classroom. It will be a great way to enhance communication and comfort in the classroom and also, if tech is used, to start teaching students alternative ways to present information.

Screen Shot 2017-12-07 at 8.37.18 PM.png

2) Categories:  Create a template with 4 or 5 different categories related to the content area and grade level being taught. After deciding on categories, select 5 or 6 letters of the alphabet, or use numbers, that students must use to come up with a word, topic or date, that ties into each category. Students can randomly be assigned to small groups and can then share what their group came up with. This activity will promote communication between peers and provide an opportunity for collaboration and some fun as well. It can also be a good way to have students review, be creative and brainstorm new ideas even. It will provide time for teachers to assess student needs and decide the next steps in the lesson, as we keep moving toward the summer break.


3) Word art: Students need different ways to practice the content and one way that helps some learners is through visual learning. Students can use vocabulary, verbs or any content material to generate word art. Students can create a word cloud using paper and marker or try using a digital tool like WordCloud, or WordItOut, or other similar word cloud generators available. After the word clouds are created, teachers can build on the learning potential by having students post their work in the classroom, having a gallery walk where other groups can discuss the terms, brainstorm new ideas, define or translate them (if a foreign language) and increase the authentic learning materials in the classroom.


4) Music: Music can really liven up the classroom and be useful for helping students remember the material. One idea is to have students create rhymes or a song using a vocabulary list, names of famous people, state or world capitals, monuments or anything related to the content area. Students can work in pairs or a small group and create a song which can be used as a mnemonic device, to help them retain the information in a more meaningful way. For presentation purposes, students can then have the choice of sharing live in class or perhaps trying a tool like Flipgrid or Recap to record and share with classmates. It can even be followed up by posting the video on a Padlet and encouraging students to comment in writing, or leave a reply on Flipgrid. These student creations will add to the authentic classroom resources and engage students more in learning.

Screen Shot 2017-10-28 at 9.04.12 PM.png

5) Creating games: Students can create a game as a way to help themselves and their peers practice the material. It can be a game made up using paper or any materials the students decide on or created using one of the digital tools available like Kahoot, Quizlet or Quizizz. Students will have a more authentic learning experience when they select the specific vocabulary they need to practice, which will will give more personalized learning opportunities.

In trying one or all of these activities, it presents an opportunity for the students to work together, to build their relationships, to collaborate and to engage in more authentic learning experiences. And it provides the teacher with an opportunity to step aside and become a facilitator, and to use the time as an opportunity to not only assess student learning but to interact more and provide feedback for students.


There are many ways to practice the content material and engage students more in learning, these are just a few of the ideas that I have tried in my classroom this school year, and they are a work in progress. Knowing that something works takes reflection and student input, and one thing I have noticed in the few short weeks we have been in school, is that students are asking more questions and thinking of new ways to extend their learning. I have more time to move around and work with every student and provide more individualized instruction and really understand each student’s progress.

They are asking, “Can we…?, What if…?, Is it okay to…?” and adding their creativity into our activities. They are also suggesting improvements, “Maybe we could…, It might be better if you…, and This has helped me to remember…can we keep doing these activities?”  And my answer to all of these has been “Yes, I think we should try it.” If it works, then great. And if not, we will try again!”


12 Tools to Try…before summer break!

Updated from the Original Post on Getting Smart, January 19, 2018

Looking for new ideas to try before the end of the school year? If you have not tried some of this, now is the time!

There are so many digital tools available today that offer opportunities for promoting student creativity, student voice, and expanding where and how students learn. I had my own list of the tools that I found made a big difference in my classroom, but decided to ask students for their input.

Here is a list of tools to try in 2018, (or to try before the end of the year, let’s keep learning!)

Each of these offer multiple ways for students to create, connect and engage in more authentic learning experiences.

Promoting Connected Learners

We were able to take our learning to a whole new level this year through Project Based Learning (PBL). Using these tools enabled us to connect with students from several Spanish speaking countries, which created tremendous possibilities for more authentic learning and broadening our cultural understanding.

1) Edmodo: Virtual learning space, where teachers can set up a digital classroom to connect students with the resources they need, in a safe learning environment. Edmodo can be used for assessments and integrates with Microsoft Office and Google, making it easy to share files with students. Students relied on Edmodo to connect with students in Argentina, Mexico and Spain for their PBL. One student said “these connections enabled me to sculpt my PBL, and learn in ways that books, videos and regular classroom lessons cannot provide.”

2) Flipgrid: Video response tool, which became one of the most talked about tools this past year after launching new features, making it even easier and more fun for students to share their ideas. Students can record up to a five minute response, add emojis to their photos and access the “grid” quickly through a grid code. It is a great tool for helping students to become more comfortable and confident in sharing their ideas and sparking curiosity with their peers.

3) Padlet: Padlet, a virtual wall, is a favorite in our classroom. Students can create a digital portfolio by uploading files and links to projects, curate resources for PBL, or have discussions with classrooms around the world. Other popular ways to use Padlet are to ask questions, post homework, or as a classroom website. Newer features include being able to “like”, “grade” or “upvote” a post and directly transfer posts to another Padlet wall.

4) Recap: Recap 2.0 is a free video response tool, which integrates with Edmodo, Canvas, Schoology, Google Classroom and Blackboard, making it easy to implement right away. It provides a comfortable way for teachers and students to ask questions by setting them up in a “Queue”. Students can submit questions and receive direct feedback, in a safe moderated environment.

Tools to Engage Students in Learning

5) Quizlet Live: Quizlet Live is a fun way to encourage student collaboration by playing a team game using a set of Quizlet study cards. Teachers select a set of study cards, launch a Live game by providing students with a join code, and students are divided into teams. To play, you need at least four players and a study set with at least 12 unique terms. Only one member of the team has the correct answer and answering incorrectly bounces the team score back to zero.

6) Quizizz: Quizizz has launched some new features, including integrating with Edmodo and Google Classroom, which makes sharing or assigning games and reviewing results much easier. When playing live, students can see the class accuracy reflected as it updates the leaderboard live with each response. There are thousands of games available in the library, making it easy to get started or create your own.

7) Kahoot!: Some big changes to the layout and options of the platform make it easier to navigate and review questions in class. Teachers can now assign “challenges” to students as a fun way to practice by sharing a code. The new “Nickname Generator” creates fun and unique usernames such as “Mystery Panda” or “Fantastic Bat” to students. It definitely saves time rather than waiting for students try to come up with their own “creative” names.

8) Kidblog: Blogging has many benefits for helping students to express themselves and begin to develop their online presence. Teachers can provide students with a variety of writing prompts to not only assess student learning, but promote creativity, communication, collaboration and digital citizenship skills. With Kidblog, teachers can even AppSmash (use two or more apps or tools together to complete a task) by embedding other tech tools into the platform, such as Buncee, Flipgrid or by uploading images and documents directly from Google Drive.

Creativity, Assessments, Interactive Lessons and More

9) Buncee: Buncee, a versatile presentation and assessment tool, is great for creating multimedia projects full of animations, graphics, audio, and videos. Choose from thousands of templates, backgrounds, animations and other graphics to create invitations, classroom signs, and unique “Buncees” for any purpose. Buncee enables every student to find exactly what they need to add into their project and to bring out their creativity.

10) Formative: An interactive tool for creating formative assessments, for use in class or as student-paced practice. Students enjoy using Formative because they receive feedback quickly, they are able to “show” their work and when done as practice, move at their own pace. Teachers can create Formatives with different question types, content and even the ability to upload and transform files. Try having students create their own Formatives as a way to have more personalized and authentic practice.

Immersive Learning, Coding and Problem Solving

11) Nearpod: Nearpod continues to be a game changer in our classroom. It provides so many options for presenting material as well as assessing students through diverse activities. The chance to be immersed in the virtual field trips and explore places around the world is of tremendous value for students. Educators can quickly create interactive lessons which include multiple question formats, the ability to upload content, BBC lessons, PhET simulations, and even add in GIFS! Nearpod integrates with Google Classroom and Canvas, and most recently with Remind, making it even easier to share lessons. Nearpod also added 27 “College Tours”, available in VR, a great way to have students experience different schools by immersing in the campus, without having to travel the distance.

12) CoSpacesEDU: CoSpacesEDU provides students with a way to not only create their own “spaces”, but to be able to walk in the spaces created by their peers. To explore in VR (Virtual Reality) and problem solve by figuring out how to code using Blockly, offers students a truly authentic way to learn, create and problem solve. The Gallery is full of examples to get you started with ideas for your classroom. Use CoSpaces to have students represent a scientific concept, a book report, or create a scene representing something studied in any content area. Talk about creativity, imagination, innovation and critical thinking, and more all in one tool.

In the End

These are just 12 of the many tools out there for education. The most important thing to remember is the “Why”? behind using these in the classroom. While these 12 tools made a difference in my classroom, they may not have the same impact in yours, but I do recommend giving them a try. Think about the tools you are currently using to amplify or facilitate student learning. What is making a difference in how, what and where students learn? Could one of these be used in place of another, as a way to engage students more in learning, or even better, provide opportunities for students to move from consumers to creators?

My advice is to simply choose one of these 12 tools and give it a try. See how it goes, ask your students for some feedback, and then plan your next steps.

Rubicon Summit: Classroom’s Journey To Student-Led, Interactive Lessons

A Classroom’s Journey To Student-Led, Interactive Lessons

Written for the RUBICON SUMMIT

About two years ago, I found myself struggling to find ways to keep my students engaged in the lesson. I tried to get them involved more in class activities by offering more choices and providing opportunities for them to be part of the decisions made about what we were doing in the classroom. Why did I do this? Partially because I saw – and could feel – a decrease in student motivation and engagement. It was approaching the end of the school year, and the focus had shifted more to “when does summer begin?”

So I tried to do things a bit differently, think creatively, and take some risks. I wanted to keep us all moving, to finish strong at the end of the school year and begin summer vacation with a sense of accomplishment, to celebrate all that we had learned throughout the year and also what we had gained from these new experiences.

Educational Technology and Digital Tools with Purpose
Educational Technology provides so many resources that enable students to learn anywhere and at any time, and at a pace that is comfortable for each student. We can instruct from inside the traditional classroom, ​”​the brick-and-mortar​” ​as it is called, or from anywhere around the world. Using digital tools provides more differentiation and personalized learning, and provides opportunities for the students to move from consumers to creators. When students have choices in how to show what they have learned, they are more likely to be engaged and excited for learning. They will feel valued​,​ and the lesson and learning will be more meaningful because it has been made perso​n​al to them.

Creating Interactive Lessons
What did I change? I started by having my students create some interactive lessons using educational technology tools like Formative, Nearpod, and EDPuzzle, or even games with Kahoot! and Quizizz. It proved to be a very beneficial learning experience for all of us. By doing this, we had extra resources available that could be shared with students who might need some extra practice. I thought it went so well that I decided to take it a step further and start a “teacher for a day” activity during which the students create a lesson based on a grammar topic or vocabulary.

I stepped back and had the students lead our classroom. It was a really good way to learn a lot more about the students, to better understand what their needs were in terms of the content material, and for the students to learn about each other. Giving students the control and the opportunity to become the creators and leaders in the class has tremendous benefits and it has been something that we have enjoyed.

Giving Students the Control
At first when students created interactive lessons, I would launch the lesson and control it on the SmartBoard, but find ways to involve the student who created it during the presentation. I eventually decided to move aside, and took a seat in the back of the room, having the student lead the lesson, give explanations, answer questions, call upon students for answers, and provide feedback. Having the opportunity to sit back and experience this was tremendous. The students enjoyed the activity, supported each other, collaborated, and provided some positive feedback to each of their classmates. I was very impressed with how well they taught, led, and learned during each of the “teacher for a day” lessons.

Empowering Students in Learning
The use of these digital tools means ​that ​the “time and place for learning” is no​ longer​ confined to the ​traditional time and setting of the physical ​classroom​. It opens up the learning environment ​to​ anywhere​, at any time and at a pace that is comfortable for the students as well. Learning and having timely, purposeful and authentic feedback is critical ​for growth to happen. When we shift our focus to creating opportunities, giving students the control, leaving the decision making to students to choose ​how t​o show what they have learned, or ​letting them​ design their own assessments, they are more empowered in their learning.

What are the Next Steps?
Have a conversation with your students and ask for their honest feedback. What did they like? What did they not like? Which lesson or format seemed to help the most? What did it feel like to be in control, decide how to deliver the lesson, and experience being the teacher? You can have this as a face to face conversation, students can respond on paper, or use one of the many digital tools available for communication. No matter which way you choose, look to your students for the valuable feedback to decide your next steps. Be sure to ask yourself these same questions and continue to reflect on steps taken and progress made!

For more strategies about integrating technology into instruction, read Overcome

EdTech’s Problems With Blended Learning!

Globally Connecting Learners through Project Based Learning

Published on Getting Smart, November 15, 2017

In honor of International Education Week, we’re bringing you a series of blogs that celebrate the benefits of global competencies, international education and cultural exchanges. Stay tuned for more like this throughout the week!

Project-Based​ Learning​ (PBL)​ offers tremendous benefits for students to become engaged in more authentic and purposeful learning. Providing opportunities in which students have choices in what to explore, where to seek information, and ultimately how to share their learning, will lead to higher student engagement and more meaningful learning experiences. By giving students the chance to be curious in exploring a concept which is of personal interest, or working together to tackle a problem or engage in some challenge-based learning, we foster more student-driven classrooms and promote curiosity in learning.

As educators, we need to strive to open up opportunities for students to broaden their perspectives, to engage in collaboration with their peers, and more importantly, to become globally connected learners. PBL is a way to connect our students globally and it also addresses the 4 C’s: critical thinking, collaboration, communication, and creativity. Opportunities like this, in which students can become more independent and have choices for where their search leads them will amplify the learning potential of all students in the classroom as well as for the new connections made.

Entering my second year of project-based learning I wanted to take it to another level with my Spanish classes, after attending and presenting at EdmodoCon. I was  amazed at the power of technology to unite educators from around the world and I wanted to do more in my classroom. Learning from such diverse perspectives, and fascinated by the ability to communicate with my new colleagues, at any time from around the world further solidified my belief that this was something that must be done in my classroom. I wanted my students to have as many diverse, authentic opportunities to explore the world as they could.

Setting up a process to connect students with the world can take some time to plan as you must decide what is the best method and structure to use, but getting the connections started is really quite simple. There are many different learning communities available depending on what is used for a classroom website. I use Edmodo, but there are also professional learning communities available through ISTE or Google+. Getting started simply takes posting a message in the community and awaiting responses from other educators interested in making new connections.

Here is the process I followed to get started with my class:

Screen Shot 2017-10-28 at 9.48.24 PM.png1. Shared the idea: I told students the idea for making global connections and the “why” behind this newexperience. While doing PBL, it is essential to have the students connect with real-world experiences in authentic ways. Once I explained to my students how I had planned to do this, I then posted a message in a few of the Edmodo communities. In my message, I explained what my students would be doing, the types of topics they would be learning about and how we could collaborate.

2. Collected responses: I received several responses to my message and replied to each to gather more details about the age group of the students, the location of the classroom and options for connecting our classes.

3. Created groups on Edmodo: Once several educators were interested, I created a separate group on Edmodo and shared the join code with my students as well as the students from the other classrooms. Edmodo provides a safe place to interact to not only help students become globally connected and share their perspective, but is also an opportunity to learn and connect with other educators.

4. Got started: We started by simply making introductions and then the students started to ask questions related to their project-based learning and essential questions. The students were amazed and excited about how quickly responses were received and how willing the other students were to share information, provide resources and interact with one another. It has been tremendous to see how much the students have learned in such a short amount of time. This type of learning could not occur without technology, it provides authentic and personalized learning because the students are connecting globally and broadening their perspectives in a more engaging and personalized way.

5. Expanded the project: In order to take it even further, once the conversations and connections had been established, we wanted to interact through audio and video. Due to the difference in time zones and schedules, we needed to find a more convenient way to interact. Flipgrid presented the perfect solution for setting up an online space for students to introduce themselves, show their schools, and have some fun interacting in a moderated and safe environment. It was very exciting to receive the notifications that a new Flipgrid response had been posted, and watching it immediately in class was fantastic for the students. Students can learn by looking at pictures, reading books and watching videos but to be able to interact in this way and this quickly is truly an amazing experience. The best part was when the students were finally able to see the students they had been interacting with. We also used Padlet as another virtual space to interact through photos and conversations.

Screen Shot 2017-10-28 at 9.45.12 PM.png

Being an educator does not mean that you are an expert. We are constantly learning and should be seeking new ways to bring knowledge and different learning experiences into our classrooms. In just a few short weeks of working with these global connections and setting aside the time to open up and increase the learning potential for my students, I have learned so much. For the four teachers in our group, this is the first time that any of us are doing anything like this and we are learning and growing together. We are enjoying the experience with our students and the best part for me, is learning more about my own students through their interactions online and I believe that the students are learning more about themselves as well.

Why Students should learn to code and how to get started

Published originally on Getting Smart December 15, 2017

Coding is one of the topics that has received greater attention in education over the past couple of years. With a greater emphasis on computer science and coding and the demand for knowledge in these areas, there has been an increase in the variety of resources available to encourage schools to provide opportunities for students to learn about coding. The “Hour of Code” takes place annually during “Computer Science Education Week”. The week is in recognition of the birthday of Admiral Grace Murray Hopper, a computing pioneer. To see some of the events and activities from this year’s “Hour of Code” week, go to the Code.org site or check out the hashtags on Twitter for #HourofCode and #CSweek.

The goal of participating in an “Hour of Code”, is to show that anyone can code and to highlight how vital computer science knowledge is for today’s students, as it helps them to develop the skills they need to be prepared for their future. Data provided on Code.Org provide statistics which support the growing need for students to have opportunities to learn about and develop skills in coding and computer science. According to the site, the majority of schools do not teach computer science, with only 40% reported as having courses available for students. For careers in STEM, 71% of the jobs available are in computing, however, only 8% of STEM graduates are in Computer Science. As for future employment, computing jobs are the #1 source of new wages in the United States, a number that is expected to increase. In addition to the future benefits for employment, what are the other benefits of coding for students?

Why should students learn to code?

Coding is something that each student can do and is a more engaging way for students to work on their collaboration, critical thinking and problem-solving skills. Coding can help to promote SEL (Social and Emotional Learning) skills as well. For example, in working through the various modules available on Code.org or through other coding programs, students develop their self-awareness as they work through the challenges of coding and they develop a greater understanding of their strengths and being able to set goals for oneself based on this self-awareness. Students will become more confident as they problem solve and experience success along the way and by helping peers as well. Students build relationship skills through the collaboration during activities, seeking and offering help when needed and learning to cooperate with one another to solve a coding challenge.

Students can also experience more inquiry-based learning, where they are exploring on their own, problem solving and discovering how to make a program work, where the steps fit in and then being able to share the experience with one another. Personally, I enjoy trying to work through the activities on my own, to experience the challenges and be better equipped to anticipate student questions, but also to be more familiar with areas of struggle.

Getting Started

The idea of coding can be a bit overwhelming, at least that is how I felt when I first started a few years ago with the game Hopscotch. It was challenging to create a game and it took a lot of patience to push through. However, back in the early 1980s, as a 7th-grade student, I had my first experience in writing lines of code with the Apple computers. Once you learn the basic structure and the commands, it is a gradual process that does not seem to take too long to master. Even nearly 35 years later, the concept of coding really is quite the same, except that we can create more visually engaging games and programs. There are so many resources and websites available to help educators and students get started, making it less intimidating than it may initially seem.

When trying some of the resources below, be sure to engage students in discussions about their experience with coding. Encourage students to share with their peers and talk about professions which require coding skills or to brainstorm areas where knowledge of coding will prove to be beneficial. Providing this time for students to interact will help them to develop their SEL skills, by building peer relationships and supporting the classroom culture.

Working with students

Be ready for students to express some frustrations when trying to work through the activities. Even if you don’t have experience coding, it’s a great opportunity to learn right along with the students and in many cases to learn from them. How do you prepare? I recommend trying each of the activities on your own, so you are familiar with the set-up and the types of tasks that the students will be completing. As a Star Wars fan, I started with the basics and did encounter some difficulty mid-way. As it turns out, a few of my students had the exact same problem with it and asked for help. Although I did figure out how to work through it, I wanted them to work through it on their own as well. We need to give students time and space to problem solve, to ask for peer support and to experience the frustration that comes with solving problems and the joy that replaces it when the solution is reached.

Seeing the students begin to collaborate and step in to help their peers, demonstrated the benefits beyond just learning to code, it promotes their SEL skills. A lot of what is involved in coding is critical thinking, problem-solving and definitely collaboration and with all this comes an amount of frustration perhaps when the code does not work as one expects. This is when we see the students start to connect and help one another and I have also seen students become very frustrated, understandably but it is what we do with that frustration, pushing through even in the face of challenges, knowing that there is support available amongst peers and the “teacher” in the room. There is always an identifiable teacher, but as we have learned in our classes, we all have something to learn and something to teach.

Ten resources to try

  1. Code Studio: A part of the Code.org, there are full courses available for learning different types of code, for different grade levels, as well as one-hour tutorials on themes such as Minecraft and Star Wars. Teachers can also use the “App Lab” and “Game Lab” to help students learn how to create using Javascript. Also available are more than 20 million projects created by students.
  2. Scratch: Created by MIT, Scratch is a website for more than just programming. Scratch provides an online community for sharing projects and for learning from the library of resources available on the site.
  3. Code Academy:  Through Code Academy, you can enroll in courses to learn how to program, or search the catalog to find a specific language to learn, such as Java, Javascript, HTML and CSS, for example.
  4. BrainPOP: Teachers can engage students in the “Creative Coding” module, in which students create stop-motion animation movies, memes and newscasts. Students follow the instructions to write their own lines of code and see how each line changes the program. Working through the module leads students to create their own codes and publish a movie or create a meme. The Creative Coding module is free for Teachers through the end of the year.  There are also lessons available which focus on Computer Science and Coding and offer a variety of activities for students to develop their skills.
  5. Hopscotch: an iPad app in which students can learn to make their own games and apps, available for students ages 8 and older. There are tutorials which include videos and lessons plans, making it easy to get started with this in class.
  6. Swift Playground: An iPad app that enables students to get started with coding quickly, without any coding knowledge. Students can start by solving puzzles in order to learn the basics, and then continue through challenges to do more advanced coding.
  7. Pencil Code: A collaborative programming site which provides resources for teachers, student project samples, and choices of creating games, playing music, drawing art, and working with mathematical equations and graphing.
  8. TeachersFirst: There is a rather extensive list of different types of websites for coding based on theme and grade level for getting students involved.
  9. Girls Who Code: A non-profit organization which focuses on closing the gender gap in technology. Girls Who Code offers information for creating after-school clubs for girls in grades six through 12 to learn about coding, as well as two-week-long summer courses and a seven-week-long specialized summer program for 10th and 11th grade girls to learn about coding and job opportunities.
  10. Khan Academy: A non-profit organization which offers free educational resources including practice activities and videos, which enable you to learn at your own pace. Khan Academy provides lessons on Computing, with options including computer animation, hour of code, computer programming and computer science. It is easy to get started by either choosing the basics and working through a whole lesson, or selecting a specific concept.

Coding is not just about learning to write a program, it’s about connecting with the learning and building relationships in the process. Learning to problem solve, collaborate and work together to build skills for the future. Developing our interpersonal skills and fostering the development of meaningful and supportive relationships in the classroom will empower students in learning.

New features to our favorite tools: Part II

Kahoot!

Over the past couple of years, there have been a lot of new features added to make Kahoot even more engaging for students and teachers. Some of my favorite features are the questions automatically going through to the next one, the podium feature, its method for kicking out inappropriate names, the new Kahoot! app and other subtle changes to layout and options of the platform.  This year has brought two new things, that may be my favorites so far.

The first one I learned about while at ISTE in San Antonio, when I had the opportunity to spend some time with the team of Kahoot and learned about the “challenges” that they were creating. If you haven’t had the chance, you can “challenge” students to complete one of your games by sharing a code with them, just as you do for the live games but students can log into it within the app on their phones. Students can even challenge one another on different topics that they find in the app and so it’s a good way to provide practice for students outside of the classroom, where they don’t have to rely on the Smartboard to see the questions but rather have everything available on their device.

Screen Shot 2017-12-04 at 10.25.45 PM

Photo from Kahoot! Blog

RockstarPanda, EpicFox, Friendly Moose and StellarCheetah?

But the most fun that I’ve noticed is unexpectedly was about 2 weeks ago, I created a game for my students to play and at the top of the options, I noticed the option for “generating creative usernames”. So I figured why not, selected it and couldn’t wait for the students’ responses. The generating of creative student names resulted in my students saying that I was taking away their creativity. Kind of funny but these generated names were much more original than the names that they had commonly used when joining our games. I’m not going to lie, it was quite fun to yell out who is “Mystery Panda”, “Fantastic Bat”, “Daring Dog” rather than the usual names. Plus I think it’s a nice way to have anonymity in the game so that students feel more comfortable answering and not so worried about what their score is in front of everyone else.(Even though the often yell out what their score is).

The “Nickname Generator” has a list of 800 unique two word name combinations and using it is a great idea, because it saves the time lost while students try to come up with their own “Creative” names.

Games for the Hour of Code

In recognition of the week of December 4th through the 10th, being Computer Science Education Week, and the “Hour of Code”, Kahoot has added some games to help students understand some basics of coding. Try these out for some fun ways to get the students involved with coding and use the game as a starting point for some class discussion.

Screen Shot 2017-12-04 at 10.24.44 PM.png

From Kahoot!

New Look for the Kahoot details page

 I noticed something different when I launched a Kahoot game and that was the appearance of the page once I clicked on the game we wanted to play. It has a much clearer appearance, easy to navigate and a nicer layout. Here is how it looks:

Screen Shot 2017-12-04 at 10.17.26 PM.png

The “Play” and “Challenge” buttons are easy to find. You can see the questions and timers for each. By selecting the “Show Answer”, you are then able to see the choices for each and the correct response for each question.

Screen Shot 2017-12-04 at 10.20.48 PM

New features to our Favorite tools! Part I

Here is the first part of a series focused on some of the latest updates to four of the digital tools that we regularly use in our classroom. I admit that I may have been more excited than the students, when I came across these updates, but once we tried them in class, the students were just as excited for these new features.

First is Nearpod. Nearpod + VR College Tours and Remind! Nearpod has been a game changer in my classroom. Students have engaged more in learning when we do lessons in class and they are interested in creating their own lessons, and taking on more of a leadership role by running the lessons on their own. Nearpod continues to add new features, making it a versatile tool that provides an immense library of lessons to choose from and a wide selection of activities, content and other resources to include into each lesson. Over the past few months, Nearpod has made some updates and integrated new features into the already extensive platform. Some of the new features  launched include: having more than 50 video lessons available through the BBC, option to view in “Student Mode” on the Teacher Dashboard, PheT Sims interactive Math and Science Lessons, and  making lessons with these resources available for immediate implementation into class. It is easy to find lessons that pertain to different content areas and grade levels, and which include a variety of tools for assessment and for engaging students more in learning.

Nearpod provides a very user friendly interface, which makes it easier for teachers to start using Nearpod and to build comfort when designing their own lessons. It is also highly beneficial for keeping the students actively learning on days when teachers have to be away from the classroom, through the use of Nearpod for Subs.
Launching lessons can be done live, with a join code in class, or shared through
a link, social connections, or through Google Classroom. But there is a new
update that makes it even easier to share, and that is Nearpod’s integration of
Remind as a way to share lessons. By integrating with Remind, educators send
the link through Remind, enabling students to start the lesson whenever they can
and wherever they are.
Another recent addition to the vast Nearpod library are the College Tours,
available in VR. What a great way to have students take a look at different
schools, without having to travel the distance, and to be able to immerse in the
campus and look around. There are currently 27 different colleges represented in
the collection, which include Universities such as Cambridge, Oxford, UNAM and
Taiwan and Tokyo, to name a few. A really great addition to the Nearpod collection and I recommend checking out the tours, and you can even use these as a way to create a scavenger hunt for students.